BlueStacks is the most popular Android emulator, allowing you to run a full Android operating system environment directly on your Windows or macOS computer. It’s essential for gamers who need keyboard and mouse control, or for developers testing apps without a physical phone.
This guide covers the necessary pre-setup steps, a clean installation walkthrough, and the critical performance tuning that makes the difference between lag and smooth gameplay.
Why You Should Use BlueStacks
BlueStacks isn’t just a simple window for your phone screen; it’s a specialized environment that leverages your PC’s hardware.
| Feature | Practical Benefit (Experience) |
| Superior Performance | Unlike a mid-range phone, BlueStacks uses your dedicated CPU cores and high-speed RAM, cutting down on lag and frame drops in resource-heavy games like Genshin Impact or PUBG. |
| Input Control | It includes a powerful, customizable Keymapping Tool. This lets you map virtual on-screen buttons to your physical keyboard, mouse clicks, and even game controllers, giving you a competitive edge. |
| Multi-Instance Manager | You can run several separate instances of Android simultaneously. This is essential for serious mobile gamers who need to run multiple accounts or coordinate in-game actions at the same time. |
| Integrated Google Play | Access the full, secure Google Play Store ecosystem. After a quick Google sign-in, downloading apps is the same as on your phone. |
Part 1: Pre-Installation Checklist (The Important Steps)
Before downloading, you must confirm two things. Ignoring this step is the reason most users run into major performance issues or installation failures.
1. Enable Virtualization
Virtualization Technology (VT, sometimes called Intel VT-x or AMD-V) allows BlueStacks to run Android as a true, isolated environment on your PC. If this is disabled, BlueStacks will run slowly or fail to install.
- How to Check: Download a small, official tool (like LeoMoon CPU V) to instantly check if VT is enabled in Windows.
- How to Enable: If VT is disabled, you must reboot your computer, enter your BIOS/UEFI settings (often by pressing
F2,F10, orDeleteduring startup), Find the setting under a section like Security, Configuration, or Advanced, and switch it from Disabled to Enabled.
2. Confirm System Requirements
While BlueStacks has low minimum requirements, you really need the recommended specs for a good experience. I learned this the hard way.
| Component | Minimum (Basic Use) | Recommended (Smooth Gaming) |
| OS | Windows 7 (SP1) or newer / macOS Sierra or newer | Windows 10/11 / Recent macOS version |
| Processor | Intel or AMD (VT enabled) | Multi-Core Intel/AMD with high single-thread performance |
| RAM | 4 GB | 8 GB or Higher |
| Storage | 5 GB free disk space | SSD (Solid State Drive) highly recommended |
Personal Insight on Performance:
I initially tried running BlueStacks 10 on my Dell Windows 11 notebook with an 8GB DDR4 RAM, Intel Core i5 (8th Gen), and a dedicated 2GB NVIDIA GPU. Even with decent specs, the system became frustratingly slow and hot, often disrupting my other work. The primary bottleneck was the old Hard Disk Drive (HDD). After upgrading to a 500GB SSD and properly optimizing BlueStacks’ CPU and RAM settings (as covered in Part 3), the performance transformed. I can now run demanding mobile games smoothly and multitask with 20-25 Chrome tabs open without any significant lag. The shift from HDD to SSD is non-negotiable for a good experience.
If you are running on a mechanical hard drive (HDD), you should expect significantly longer loading times.
Part 2: Step-by-Step Installation Walkthrough
The download and installation process is straightforward once your system is ready. BlueStacks X (or 10) is the current version, and it includes BlueStacks 5 (the core emulator engine).
1. Download the Installer
- Visit the official BlueStacks website (
www.bluestacks.com). - Click the primary download button, which usually says “Download BlueStacks 10“. The file size is small, as the main engine is downloaded during the installation.
2. Installation on Windows
- Locate the downloaded installer file (e.g.,
BlueStacksInstaller.exe) and double-click it. - The installer will automatically check for prerequisites.
- Click “Install Now.” The application will now download the core files. This can take several minutes, depending on your internet connection.
- Once complete, BlueStacks will launch automatically.
3. Installation on macOS
- Locate the downloaded DMG file and double-click to open it.
- Drag the BlueStacks app icon into your Applications folder.
- Navigate to your Applications folder and launch BlueStacks.
- On the first launch, you may be prompted by macOS to grant system permissions (found in System Settings > Privacy & Security). You must approve these to allow the emulator to function correctly.
4. Initial Setup and Sign-In
When BlueStacks first loads, it will prompt you to sign in with your Google Account. This is mandatory if you want to access the Google Play Store to download apps and save your game progress. After signing in, you will land on the Home Screen, ready to download apps just like on a real Android device.
Part 3: Performance Optimization
The default settings often leave a lot of performance on the table. Based on our experience, manually allocating resources is the single biggest factor in achieving smooth, high-frame-rate gameplay.
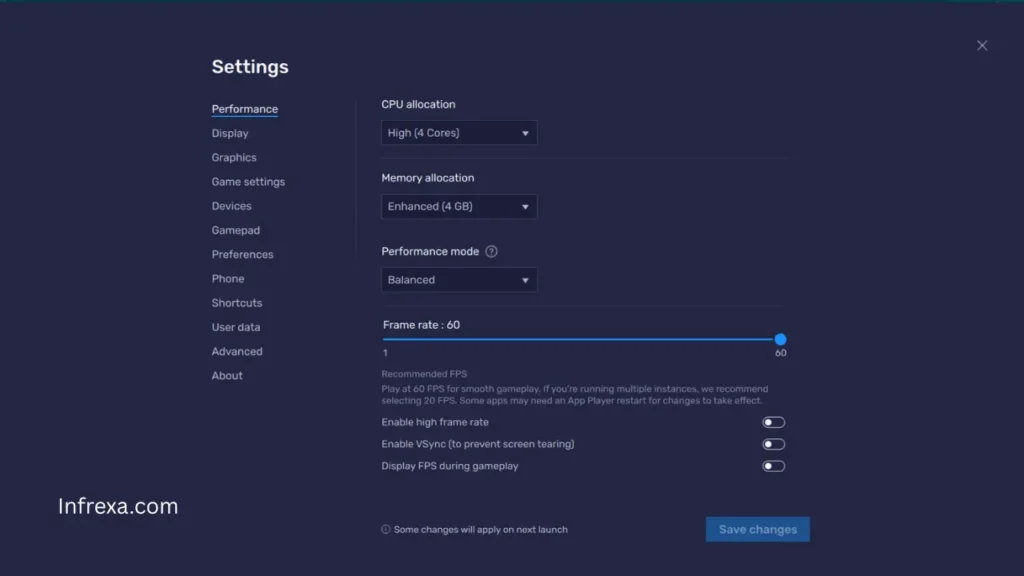
Step 1: Accessing the Performance Settings
- On the BlueStacks home screen, locate the Gear Icon (Settings) in the bottom or side toolbar and click it (as shown by the red highlighted arrow in the Screenshot below).
- Go to the “Performance” tab.
Step 2: Manually Allocating CPU and RAM
This step requires a bit of guesswork and knowledge of your PC’s specifications.
- CPU Allocation:
- Find the dropdown labeled “CPU Cores.”
- Rule of Thumb: Never allocate more than half the cores your PC physically has. For example, if you have an 8-core CPU, set this to 4. Setting it too high starves your host operating system (Windows/Mac) and causes crashes or stuttering.
- RAM Allocation:
- Find the dropdown labeled “Memory Allocation (RAM).”
- Recommendation: If you have 8GB of RAM, allocate 4GB. If you have 16GB, allocate 8GB.
- Pro Tip: For lighter apps like social media, 2GB is often fine. For demanding games, maximize this setting (up to 8GB or 12GB if you have 32GB+ of total system RAM).
- Performance Mode:
- Set this to High Performance if you are playing games.
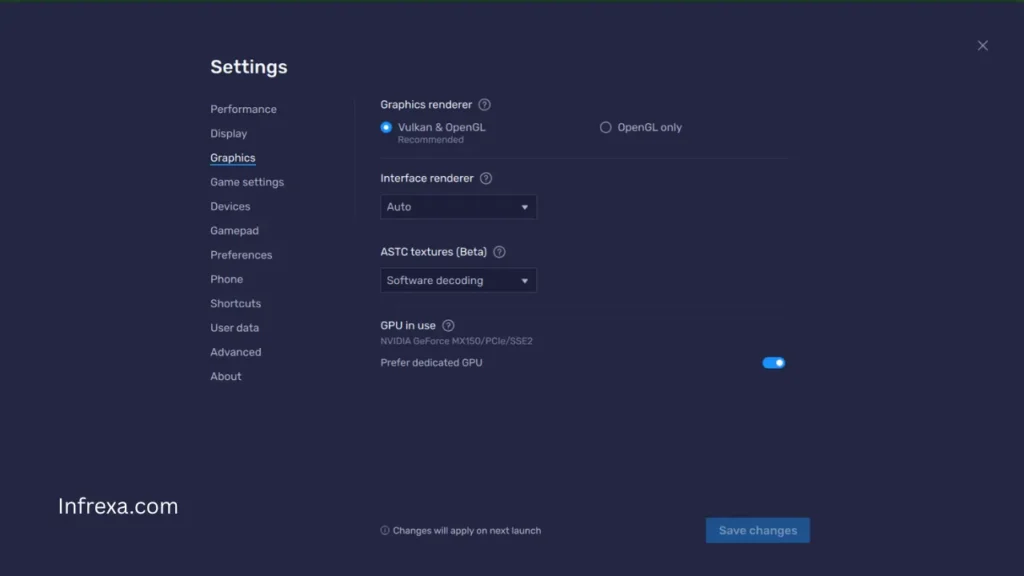
Step 3: Graphics Settings Adjustment
The Graphics tab determines how BlueStacks interacts with your computer’s GPU. Setting this correctly is vital for visual fidelity and reducing in-game graphical glitches.
- Go to the “Graphics” tab in the Settings menu.
- Graphics Renderer (The Most Critical Choice):
- Vulkan & OpenGL (Recommended): This is the best choice for all modern systems and dedicated GPUs (NVIDIA/AMD). Vulkan is a newer, high-performance rendering API that dramatically improves frame rates and stability in newer, demanding mobile games.
- OpenGL only: This option acts as a reliable fallback. If you encounter crashes or visual artifacts using the Vulkan option, switch to OpenGL only. This is also generally better for older or integrated Intel GPUs.
- Interface Renderer:
- Leave this set to Auto. This allows BlueStacks to dynamically choose the best rendering pipeline (usually DirectX or OpenGL) for the Android interface itself, which is almost always the most stable option.
- ASTC Textures (Beta):
- This setting manages how compressed texture data is handled. Leave it at Software decoding unless a specific game looks blurry or pixelated. If that happens, you can experiment with the Hardware decoding options, but be prepared for a minor performance hit.
- GPU in Use:
- If you have a dual-graphics setup (an integrated Intel GPU and a dedicated NVIDIA/AMD card, as the below screenshot shows:
NVIDIA GeForce MX150), make sure the switch labeled “Prefer dedicated GPU” is turned on (blue). This forces BlueStacks to use your powerful gaming card instead of the weaker integrated chip, which is essential for performance.
- If you have a dual-graphics setup (an integrated Intel GPU and a dedicated NVIDIA/AMD card, as the below screenshot shows:
Step 4: Save and Restart
- After making any changes, click “Save changes” and wait for BlueStacks to prompt you to restart. The changes will not take effect until you restart the emulator.
Part 4: Updating and Troubleshooting
How to Update BlueStacks
The best method is usually the in-app tool, but manual download is also reliable.
- Manual Update: Simply visit the official website, download the latest installer, and run it. The installer recognizes the previous version and overwrites the core files while leaving your user data intact.
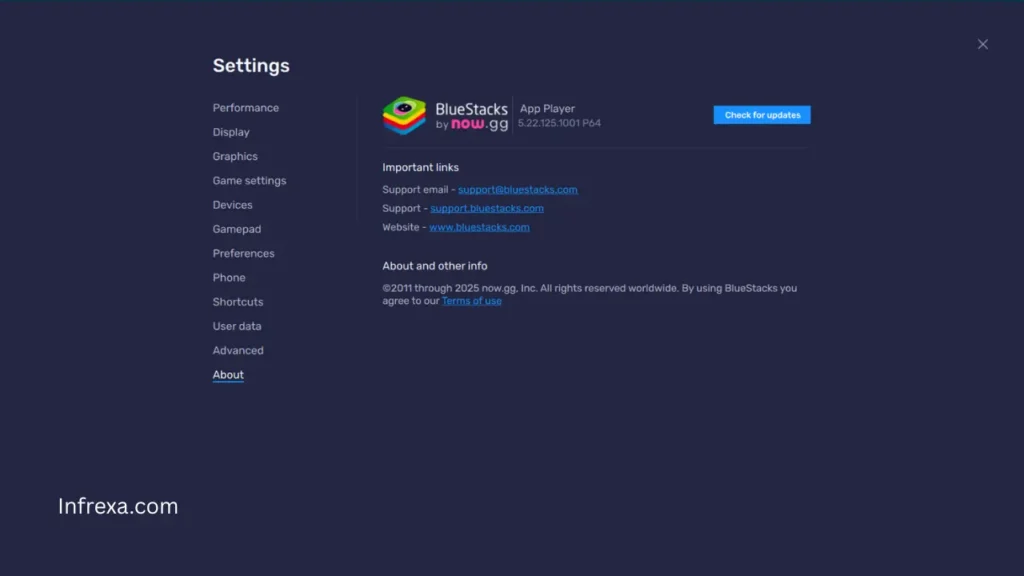
- In-App Check (Windows/Mac):
- Launch BlueStacks.
- Go to Settings (Gear Icon).
- Navigate to the About tab.
- Click “Check for updates.” If a new version is available, it will download and install automatically, preserving your apps and data.
Common Troubleshooting Tips
| Issue | Experienced Fix |
| Severe Lag/Stuttering | Go back to Part 3. You likely need to increase CPU cores or RAM allocation. If that fails, ensure Virtualization (VT) is enabled (the most common cause). |
| App Download Failure | Clear the Google Play Store cache and data within the Android settings inside BlueStacks, then restart the emulator. |
| Black Screen in Game | Check your Graphics Engine Mode (Part 3, Step 3). Switching from Performance to Compatibility often resolves rendering issues with specific games. |
| Installation Fails | Disable any third-party antivirus or firewall temporarily. These sometimes block the emulator’s drivers during installation. |
| Advanced Network Issues | If standard network settings fail, or if you are behind a strict corporate/school firewall, you may need an advanced proxy. See Proxifier: What It Is and How to Configure It to bypass network blocks and stabilize connections. |
Other Android Emulators to Consider
While BlueStacks is the industry standard and a reliable choice for most users, it is also highly resource-intensive. If you own an older PC or have specific needs, such as prioritizing low latency (like for competitive FPS games) or running dozens of simultaneous accounts, a different emulator might offer a better experience.
If you are currently evaluating your options, we have compiled a definitive breakdown of the market, including its top performers and the platforms you should avoid: Top 5 BlueStacks Alternatives & 6 Emulators to AVOID.